
1. MCP Actions Touch of Light/Touch of Darkness action (found free HERE, along with her other free actions). I've used this on almost all my photos lately. LOVE IT. I typically use it to softly lighten up a few areas of the face - especially around the eyes. Just follow her directions to use it. I use it at 20% on the brush, and sometimes change the opacity of the layer to 80%.
2. High Pass Filter. This is how I've sharpened my photos lately for print (for online viewing I do additional sharpening as detailed in my Help on Posting Images post HERE). I followed Stacey Bishop's tutorial HERE and it's very easy. I created an action that does a high pass filter and then changes the opacity to 50%, which is typically how I leave it.
3. Understanding Exposure, by Bryan Peterson. If I haven't mentioned this book before on my blog, I should have. This is my absolute favorite photography book and it's what catapulted me from shooting on the "P" setting to manual this summer. Yes, you read that right, I only started shooting manual this summer (ouch, it's painful to admit). This book made everything click for me. If you haven't read it, please oh please do. I rented the old film version from our library and it was phenomenal.
4. Shortcuts for zooming in/out. I can't remember where I read this (maybe Digital Photography School's blog?) but I use it all. the. time. Hold down Ctrl + Space bar as a shortcut to the zoom in tool, and Ctrl + Alt as a shortcut to the zoom out tool. This has saved me so much time and I don't know that I would ever have figured it out on my own. Also, if you double-click on the hand tool (looks like a white hand), your image will fill the screen (use this ALL THE TIME too!), and if you double-click on the zoom tool (looks like a magnifying glass), your image will go to 100%. These are such handy tricks I only recently learned about.
5. Highlight/Shadow Clipping Warning in Camera Raw.
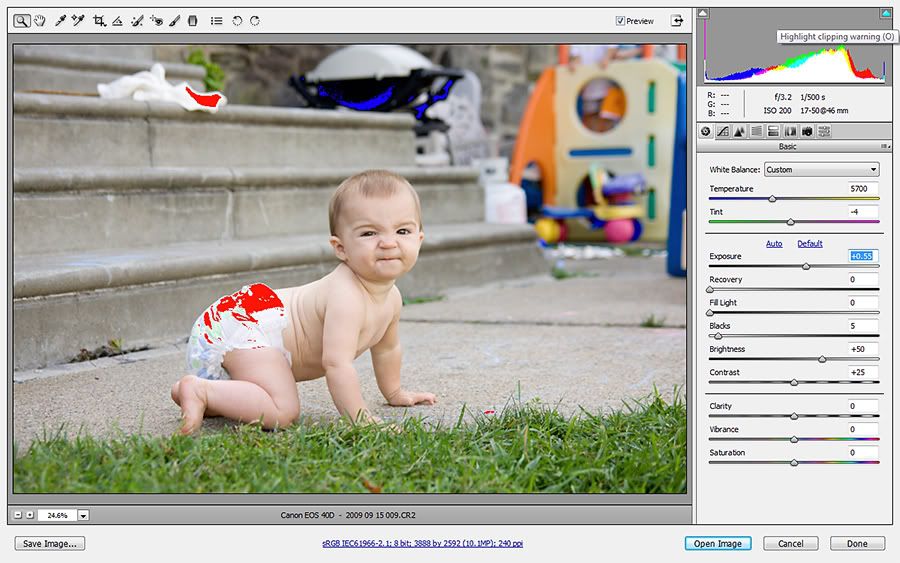
Recently, I somehow accidentally turned on my Highlight/Shadow Clipping Warnings in Camera Raw. I LOVE THIS!! Here's a screen shot. Look in the upper right-hand corner where the histogram is. There's a triangle at the shadow end and another at the highlight end. Click on those so that the warnings are activated. Essentially, this means when your highlights are blown (or clipped on the histogram), they'll show up as red on your image, and when your shadows are blown (or clipped), they'll show up as blue. You can see in my image above that there's a bit of both in my image. I then move the exposure slider over until the red disappears (unless it's on a part of the image that I don't care about, like the background if my subject is backlit) and not further, since you want to push your histogram as far as possible without clipping. This has really helped me figure out how to better nail my exposure as I see I consistently over-expose a bit, even though to my eye it's not over-exposed (if that makes sense).
6. Learning to read my histogram. Along those same lines, these videos on learning to read your histogram to nail your exposure were helpful to me, posted on MCP Action's site and created by John Mireles:
PART 3 Well, that's all for now! Hopefully this helps someone out there. Let me know if any of this doesn't make sense!


1 comment:
Thanks Danica....I'm trying to learn more about Photography and I think you do an amazing job! :)
Post a Comment